Allows you to set preferences for RoboTask. You can set preferences for how RoboTask starts, plug-ins, or service mode.
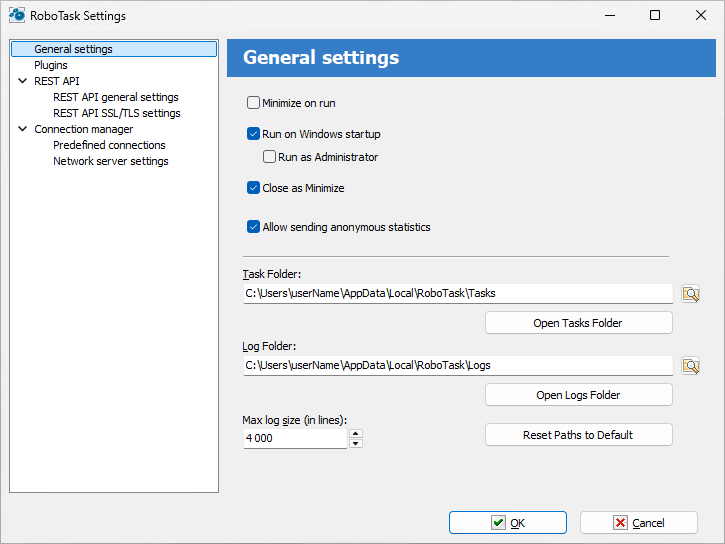
Minimize on Run
Click this check box so that RoboTask is minimized when you run the software.
Run on Windows Startup
Runs RoboTask as soon as Windows starts up.
Run As Administrator
This parameter is available only when the RoboTask is used in application mode in the operating systems using the UAC (User Access Control). That is in Windows Vista and the following versions.
If a user has the administrator’s rights on the given computer, the UAC, by default, demotes the rights of started applications in the session. Due to this, an error Access Denied is possible during some operations that demand entire rights. For example, when attempting to start or stop the system services, write down a value in a system register into the branch HKEY_LOCAL_MACHINE\SOFTWARE, etc.
Switch on this flag if you want the RoboTask to run with entire rights. In this case you have to confirm running the RoboTask manually when the UAC requests confirmation.
Close as Minimize
If this option is selected, when you click the X button on the main window caption, RoboTask will minimize. This is useful for preventing of casual closing of RoboTask.
Task Folder
Set the folder where you want to save tasks that you create. You can click the browse button to select a folder.
Log Folder
Enter a folder where you want to save log files. You can click the browse button to select a folder.
Max Log Size (in Lines)
Enter how many lines of data to record in a log file. For example, if you enter 300, the log file will contain no more than 300 lines of text.
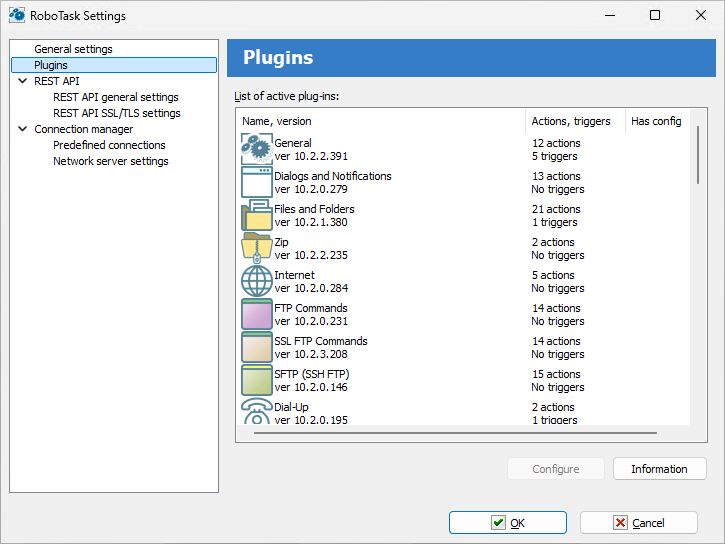
List of Active Plug-ins
Displays a list of available plug-ins for RoboTask. You can get more information when you click the Information or About buttons.
Configure
Select a plug-in from the List of Active Plug-ins box and click Configure to enter settings.
Information
Displays a list of components for the plug-in that you have selected in the List of Active Plug-ins box.
REST API (Representational State Transfer) provides some communication means (program interface) with RoboTask instance from python or JavaScript scripts using HTTP requests.
RoboTask REST API allows you to get information about RoboTask operation, get a list of tasks, as well as start or stop an individual task.
REST API server returns data in the form of JSON object. You can see the whole set of requests and also try them interactively using the API documentation (Swagger) function (see below).
To demonstrate how the REST API works, use the robotask_rest_api_demo.py script, which is located in the Demo sub-folder of the RoboTask folder.
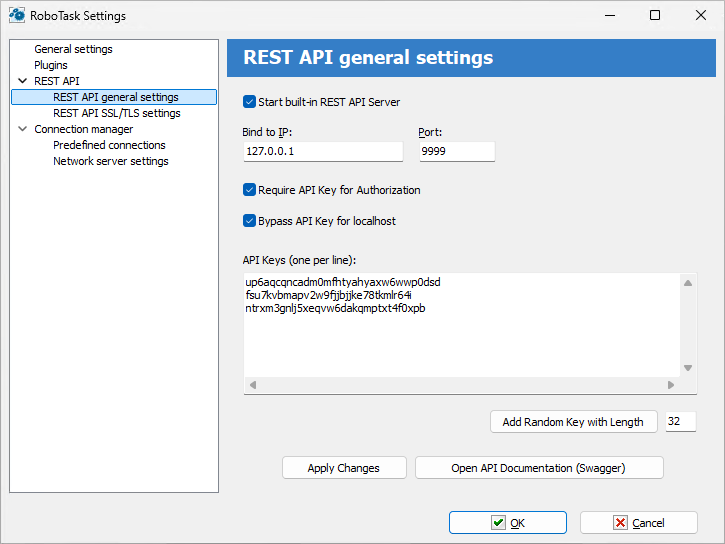
Start built-in REST API server
To start the REST API server, enable this check box. By default, the REST API server is not started. You can enable it if necessary
Bind to IP
Specify the IP address that the REST API server will use. By default, the REST API server uses the address 127.0.0.1.
The address 127.0.0.1 corresponds to localhost. In this case, you will only be able to access the server from a local computer.
Address 0.0.0.0 means that the server will use (listen to) all available addresses on the computer.
If the computer/server uses multiple IP addresses, you can specify one address to which the server will be bound.
Port
Specify the port that the REST API server will listen on.
For normal application mode, the REST API server uses port 9999
For system service mode - 9998.
You can specify any free and suitable port number.
Require API key for Authorization
Enable this checkbox if you want to authorize each connection. If you want to use REST API outside your local network, it is recommended to enable authorization mode.
Authorization on the REST API server is performed using API keys. An API key is simply a set of characters that is prescribed on the server. The provided API key must exactly match one of the registered keys. Otherwise you will get a "401, Unauthorized" error on any request
API key must be included in HTTP request headers.
Use the X-API-KEY header.
Bypass API keys for localhost
Enable this check box if you want to disable API key validation for local connections.
API keys
A list of keys defined on the server: one key per line. You can add strings manually or add a random string: specify the key length and click the "Add random key" button.
Apply changes
Apply all changes to the REST API server settings. Don't forget to apply the changes if you want to test the REST API features in "Swagger"
If you close the settings dialog with the Ok button, the REST API server settings will be saved automatically.
Open API documentation (Swagger)
Built-in API testing service. Swagger allows you to view and test all available REST API functions interactively.
Swagger runs in your default browser and shows all available REST API functions through the web interface. When testing a function, you will see the format of the request and response from the server.
To test the API key use the "Authorize" button in the upper right corner. After that specify the required API key and press "Authorize" button.
TLS (transport layer security) - traffic encryption mode. If you want to use the REST API outside your local network, traffic encryption is a must. In local network mode, encryption is not necessary.
To enable traffic encryption mode, you need a certificate and a private key in PEM format.
You can use paid or free certificates (for example, here ).
You can also create the so-called "self-signed" certificates. You can make self-signed certificates using OpenSSL or Powershell package. Read how to do it here or here .
You can also use a simple batch file (CMD or BAT). An example is shown below. If you have the OpenSSL package installed, simply run this file and answer the application questions.
Complete text of batch file:
rem You can get OpenSSL binaries here: https://slproweb.com/products/Win32OpenSSL.html
rem Apache httpd distribution: https://www.apachelounge.com/download/
rem Apache httpd contains OpenSSL binaries too
rem @echo off
set OPENSSLPATH=C:\Program Files\OpenSSL-Win64
IF EXIST %OPENSSLPATH% (
echo Using Apache at path %APACHEPATH%
"%OPENSSLPATH%\bin\openssl.exe" genrsa -out privkey.pem 2048
"%OPENSSLPATH%\bin\openssl.exe" req -new -x509 -config "%OPENSSLPATH%\bin\cnf\openssl.cnf" -key privkey.pem -out cacert.pem -days 365
) ELSE (
echo Please set OPENSSLPATH to a valid OpenSSL path (download it from https://slproweb.com/products/Win32OpenSSL.html)
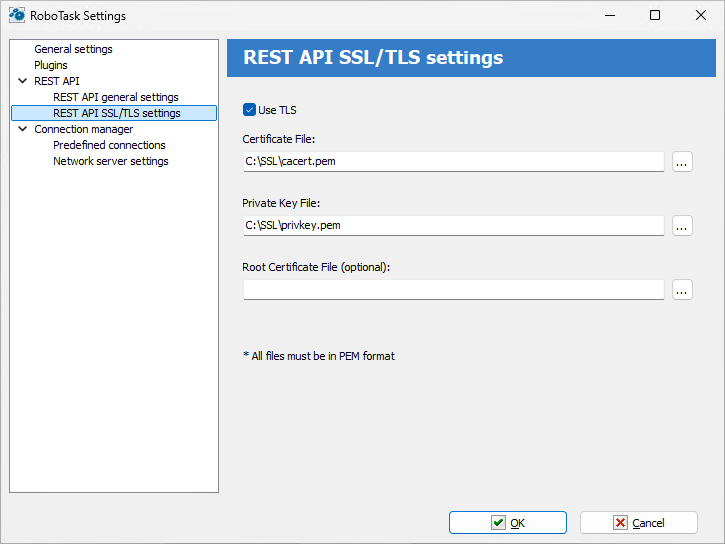
Use TLS
Enable this check box if you want to use encryption mode
Certificate file
Specify the name of the certificate file.
Private key file
Specify the name of the private key file
Root certificate file (optional)
Specify the file name of the root certificate. This field can be empty. For a "self-signed" certificate, leave this field blank.
All files must be in PEM format.
To connect to the necessary server of the RoboTask quickly, you can specify the connect parameters in advance.
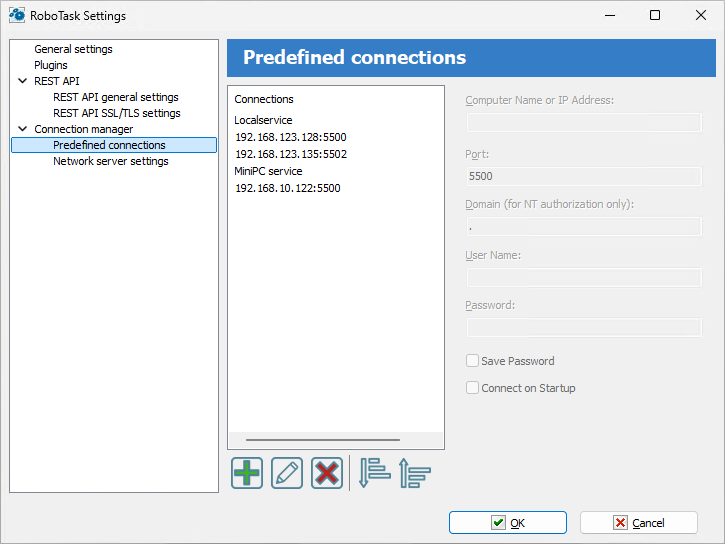
Each predefined connection contains such parameters:
•Computer name or IP address
•Port
•Domain (for NT authorization only) - you can specify single dot (.) if you are using non-domain user (local computer user)
•User name
•Password
Save Password - switch on this checkbox if you want to save password
Connect at startup - switch on this checkbox if you want to activate this connection when RoboTask starts.
On this tab you can set up server parameters of RoboTask. Read more about client-server mode here.
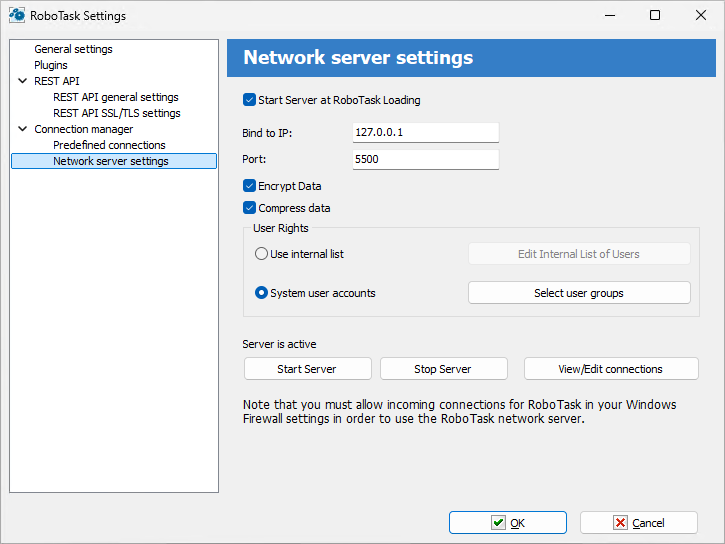
Start Server at RoboTask loading
It is on by default. Switch off this checkbox if you want to refuse from remote administration.
Bind to IP
By default this field is empty. This means that the network server is bound to all available addresses on the computer. The address 0.0.0.0 has the same effect. You can specify particular address. This is useful if the computer/server has several IP addresses.
Also you can specify local host address 127.0.0.1. In this case you can connect to server from local computer only.
Port
This is the number of a port, on which the server accepts connections. By default, it is 5500. If you use more than one instance of RoboTask at your computer, apply different ports to avoid conflicts.
For example: 5500 is for an application, 5501 is for a Service.
Encrypt data
This is the mode of traffic encryption. By default, it is on. The mode of ciphering is specified by server. A client is tuned on the mode of encryption automatically. RoboTask provides the traffic encryption with dynamic keys using CryptoAPI system functions.
Compress data
This is the mode of traffic compression. By default, it is on. The mode of traffic compression can be useful when connection is slow (for example, DialUp or GPRS). The mode of traffic compression (packing) is specified by server. A client is tuned on the mode of compression automatically.
User Rights
This is the check mode of user’s rights at connection. It is possible to choose between two modes of user checking:
•Use Internal list - When you press the button “Edit Internal List of Users” in this mode, you can define users, who have the right of connect to the server. This is just text in the form
USERNAME=PASSWORD
on every line.
For example:
admin=1234567890
At the checking of a user, the server inspects presence of the user in a list and correctness of a password.
•System user accounts - In this case RoboTask uses system user authentication. When selecting this authorization mode, be sure to specify which system groups the user should belong to. It is necessary to specify one or several groups. If the user does not belong to any of the specified groups, the authorization will fail, even if the authorization parameters are correct. For example, you can create a system user group "RoboTask users" and open access for users of this group.
If the user isn’t checked, the server returns an error and closes the connection.
By default, the System user accounts mode is on.
Start Server
It starts the server.
Stop Server
It stops the server. At that rate, all opened connections are closed.
View/Edit connections
Here it is possible to view all opened connections and to close selected connections.
Also see Network Client chapter
![]() Related Topics
Related Topics